I have been meaning to get one of these for ages now, but there is always something else wonderful from Pimoroni to spend my money on 🙂
I knew it fitted inside a PiBow, so I put it inside me PiTFT Pibow case, which doesn’t currently have its screen on top.
Setup is pretty straightforward, you just need to configure a bootup file and pop into raspi-config to enable I2C. Excellent instructions are on the Raspberry Pi website here, but a quick summary looks like this.
Configuring the PiGlow
All of the following needs to be typed into a terminal window. Type…..
sudo apt-get update
to make sure all your libraries are up to date. Then check for any upgrades by typing
sudo apt–get upgrade
You next need to install the feature that lets your PiGlow communicate with the Pi, using something called smbus with the following command:
sudo apt-get install python-smbus
You can make sure that you have installed it correctly, by typing
sudo python -c “import smbus”
Hopefully, you shouldn’t get any errors!
Enabling the I2C feature of the Pi
You also need to turn on the I2C capabilities of the Pi. To do this, you need to edit a bootup configuration file. Open up a terminal window and type:
sudo nano /etc/modules
at the bottom of this file, add this line, unless it is already there.
i2c–dev
To save and exit, you can press the keys CTRL+X and confirm by pressing ‘Y’
Final thing to do in this section is to enable the I2C feature in the Raspi-Config program.
Again, make sure you are in a Terminal window and type in:
sudo raspi-config
Go down to the Advanced Options, using the cursor keys and press the Enter key, then select the I2C option and again press Enter. On the next 2 screens, about the interface and kernel module, choose the ‘Yes’ option. Finally, exit the Raspi-Config program and reboot the Pi.
Downloading the PyGlow Python files
Make yourself a PyGlow folder to store the Python files
In a terminal window, enter the following:
mkdir pyglow
cd pyglow
Now to get the Python files from the internet and into this folder, type:
wget http://goo.gl/zQ3CHB –O PyGlow.py —no–check–certificate
wget http://goo.gl/18fwzn –O test.py —no–check–certificate
Now to get some lights on your PiGlow!
You’ll need to open a Python coding window as a ‘Super User’ to use the PiGlow, so again in a terminal window, type in.
sudo idle &
If the Python shell has opened (You will see a copyright notice and lots of chevrons) you need to start a blank coding window by clicking on ‘File’ and ‘New Window.’
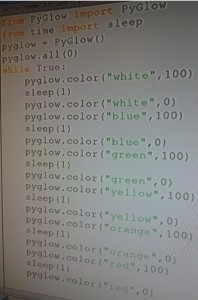
Here are two programs to try out, the first pulses the lights on the PiGlow.
The second turns them on from inside towards the outside.

Hmm, looks like I need to use an array/list and loop for that one. I’ll add it to the job list!
